Go ahead and close your terminals and open a new terminal window
ImageMagick:
sudo port install perl5.34
sudo port install imagemagick
sudo port install p5.34-perlmagick
% sudo port install perl5.34
--->  Computing dependencies for perl5.34
The following dependencies will be installed:
 db48
 gdbm
 gettext-runtime
 libiconv
 ncurses
 readline
Continue? [Y/n]: Y
.....
% sudo port install imagemagick
--->  Computing dependencies for ImageMagick
The following dependencies will be installed:
 aom
 bash
 brotli
 bzip2
 cairo
 coreutils
 dav1d
 djvulibre
 expat
 fftw-3
 fontconfig
 freetype
 gdk-pixbuf2
 ghostscript
 giflib
 glib2
 gmp
 gobject-introspection
 icu
 imath
 jasper
 jbig2dec
 jbigkit
 kvazaar
 lcms2
 lerc
 libde265
 libdeflate
 libedit
 libelf
 libffi
 libgcc
 libgcc14
 libheif
 libidn
 libjpeg-turbo
 libpaper
 libpixman
 libpng
 libraw
 libtool
 libxml2
 lz4
 m4
 mpdecimal
 openexr
 openh264
 openjpeg
 openssl
 openssl3
 pcre2
 perl5
 pkgconfig
 py313-mako
 py313-markdown
 py313-markupsafe
 py313-setuptools
 python313
 python3_select
 python3_select-313
 python_select
 python_select-313
 shared-mime-info
 sqlite3
 svt-av1
 tiff
 urw-fonts
 webp
 x265
 xorg-libX11
 xorg-libXau
 xorg-libXdmcp
 xorg-libXext
 xorg-libXt
 xorg-libice
 xorg-libsm
 xorg-libxcb
 xorg-xcb-proto
 xorg-xcb-util
 xorg-xorgproto
 xrender
 xz
 zlib
 zstd
Continue? [Y/n]: Y
....
--->  Some of the ports you installed have notes:
  coreutils has the following notes:
    The tools provided by GNU coreutils are prefixed with the character 'g' by
    default to distinguish them from the BSD commands.
    For example, cp becomes gcp and ls becomes gls.

    If you want to use the GNU tools by default, add this directory to the front
    of your PATH environment variable:
        /opt/local/libexec/gnubin/
  libheif has the following notes:
    Support for rav1e now disabled by default; enable via +rav1e
  libidn has the following notes:
    GNU libidn2 is the successor of GNU libidn. It comes with IDNA 2008 and TR46
    implementations and also provides a compatibility layer for GNU libidn.
  python313 has the following notes:
    To make this the default Python or Python 3 (i.e., the version run by the
    'python' or 'python3' commands), run one or both of:

        sudo port select --set python python313
        sudo port select --set python3 python313
  shared-mime-info has the following notes:
    A startup item has been generated that will start shared-mime-info with
    launchd, and will be enabled automatically on activation. Execute the
    following command to manually _disable_ it:

        sudo port unload shared-mime-info
Depends on which version of Python 3 gets installed/available, you may want to set the default version of Python by running the ‘select -set’ commands at the bottom of the install
sudo port install p5.34-perlmagick
sudo port install p5.34-image-exiftool
% sudo port install p5.34-image-exiftool
--->  Computing dependencies for p5.34-image-exiftool
--->  Fetching archive for p5.34-image-exiftool
--->  Attempting to fetch p5.34-image-exiftool-13.300.0_0.darwin_any.noarch.tbz2 from https://packages.macports.org/p5.34-image-exiftool
--->  Attempting to fetch p5.34-image-exiftool-13.300.0_0.darwin_any.noarch.tbz2.rmd160 from https://packages.macports.org/p5.34-image-exiftool
--->  Installing p5.34-image-exiftool @13.300.0_0
--->  Activating p5.34-image-exiftool @13.300.0_0
--->  Cleaning p5.34-image-exiftool
--->  Scanning binaries for linking errors
--->  No broken files found.
--->  No broken ports found.
download MacOS version of jhead and install it in /opt/local/bin
sudo port install wget
% sudo port install wget
--->  Computing dependencies for wget
The following dependencies will be installed:
 curl-ca-bundle
 gnutls
 gsettings-desktop-schemas
 libidn2
 libproxy
 libpsl
 libtasn1
 libunistring
 libxslt
 nettle
 p11-kit
Continue? [Y/n]: Y
% cd ~/Downloads % wget https://www.sentex.ca/~mwandel/jhead/os-x/jhead --2025-05-26 15:24:31-- https://www.sentex.ca/~mwandel/jhead/os-x/jhead Resolving www.sentex.ca (www.sentex.ca)... 64.7.148.55 Connecting to www.sentex.ca (www.sentex.ca)|64.7.148.55|:443... connected. HTTP request sent, awaiting response... 200 OK Length: 72696 (71K) Saving to: ‘jhead’
jhead 100%[===================>] 70.99K 291KB/s in 0.2s
On MacOS(Monterey v12.5), I had to download and install the driver for Tripp-Lite USB to DB9 adapter and use the following command to connect to APC Masterswitch:
screen /dev/tty.usbserial-1410 2400,cs8,-ixon
I did some web searching and found the following firmwares:
aos309a.bin – APC OS for AP9606(download link below)
ms225a.bin – Masterswitch Application(download link below)
After 10+ years of using custom build ZFS NAS Server hardware, I have decided to go with either Dell or HPe Workstation H/W for my home ZFS NAS server running XigmaNAS/FreeNAS
Making the long story short, I decided on HPe Z840 Workstation which has built-in SAS 9207-8i with LSI 2308 controller.
From the factory, it is configured with RAID Mode(RI) and in order to be used with ZFS NAS Server, it needs to be converted to Target Mode(TI)
I did some searching and found some good information and instructions but I had to do some deep-searching to get all the files that I need to create the bootable USB with all three(3) firmware/BIOS
Here are some packages that I download to create a bootable USB stick for the IT mode flash: Installer_P20_for_UEFI.zip sas2flash.efi 9207_8i_Package_P20_IR_IT_FW_BIOS_for_MSDOS_Windows.zip 9207-8.bin and mptsas2.rom
How to see the current Windows License Key: 1. run ‘regedit’ 2. capture Computer\HKEY_LOCAL_MACHINE\SOFTWARE\Microsoft\Windows NT\CurrentVersion\SoftwareProtectionPlatform\BackupProductKeyDefault
Deactivating Windows License: 1. run Command Prompt with ‘Run as administrator’ 2. type ‘slmgr /upk’ 3. type ‘slmgr /cpky’ (to clear registry)
Activating Windows from Command Prompt: 1. run Command Prompt with “Run as administrator’ 2. type ‘slmgr /ipk xxxxx-xxxxx-xxxxx-xxxxx-xxxxx’ 3. type ‘slmgr /dlv’ (to verify)
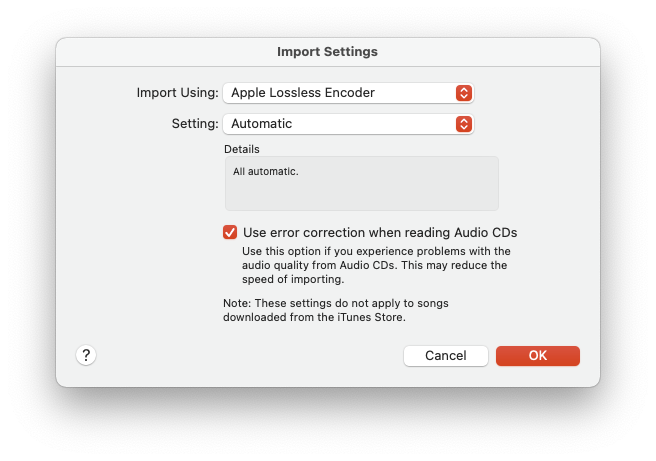
It has been a long time since I rip a CD to FLAC files and I used to do this on Windows. Now my primary system is macOS, I want to find out how to do this on a Mac.
I decided to use macOS Music/iTunes to extract tracks from CD to Apple Lossless Audio Codec(AAC):
A Better CD Encoder(ABCDE) with Homebrew installed, “brew install abcde”
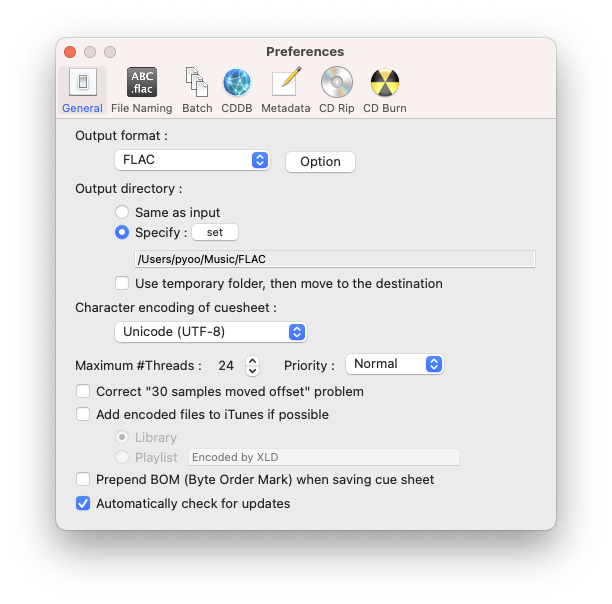
X Lossless Decoder(XLD) – just run it once and set the Output format and directory then open the AAC files with XLD and it will convert them to FLAC automatically
I used “NOOBS (offline and network install)” iamge onto a 8GB SD Card for installation.
1. Download the SD Formatter 4.0(link above) and install
2. Insert a SD Card 4GB+
3. Run the Formatting Tool
3a. Make sure the correct drive is selected
3b. Click on the Options and select “FORMAT SIZE ADJUSTMENT”
3c. Click OK
4. Click the Format button
5. Unzip the downloaded NOOBS image(link above)
6. Copy unzipped files(all) onto the root of the SD Card
7. Insert the SD Card in the SD Card Slot on the Raspberry Pi
8. Power up the Raspberry Pi with at least HDMI, USB Keyboard connected
By default, NOOBS will output over HDMI at your display’s preferred resolution, even if no HDMI display is connected. If you do not see any output on your HDMI display or are using the composite output, press 1, 2, 3 or 4 on your keyboard to select HDMI preferred mode, HDMI safe mode, composite PAL mode or composite NTSC mode respectively.
1. HDMI mode this is the default display mode.
2. HDMI safe mode select this mode if you are using the HDMI connector and cannot see anything on screen when the Pi has booted.
3. Composite PAL mode select either this mode or composite NTSC mode if you are using the composite RCA video connector
4. Composite NTSC mode